

 中文
中文Ambari Installation and Custom Service Initial Implementation
Ambari installation
1 Ambari profile
Apache Ambari project by developing software is the purpose of the hadoop cluster configuration, monitoring and management, in order to make the management more simple hadoop.Ambari also provides a RESTful interface implementation based on itself of intuitive, easy-to-use web management interface.
Ambari allows system administrators to the following:
1. Provide installation management hadoop cluster;
2. Monitor a hadoop cluster;
3. The extension ambari custom service management functions.
2 Basic conditions needed for cluster
2.1 The demand of the operating system
• Red Hat Enterprise Linux (RHEL) version 5. X or 6. X (64);
• CentOS v5. X, 6. X (64) or 7. X.
• Oracle Linux version 5. X or 6. X (64);
Selection of this document is the CentOS version 6.5 (64);
2.2 System based on software requirements
On each host to install the following software:
(1) yum and RPM (RHEL/CentOS/Oracle Linux);
(2)zypper(SLES);
(3)scp,curl,wget;
2.3
The demand of the JDK
Oracle JDK 1.7.0 _79 64 – bit (default)
Its 7 64 – bit (SLES does not support)
3 Before installing the software prerequisites
3.1 Ambari and the conditions needed for monitoring software
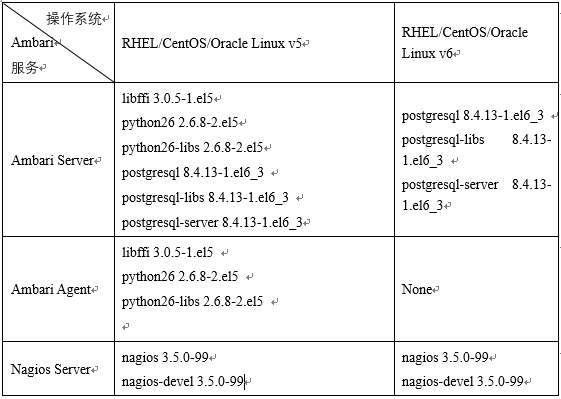
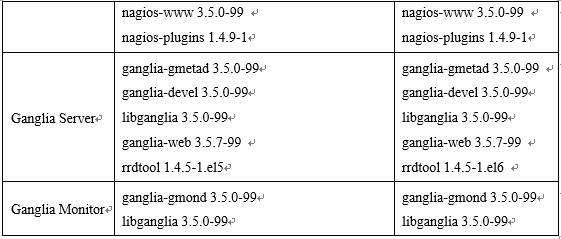
Ambari before installation, in order to guarantee ambari services and the normal operation of the various monitoring service, according to different operating systems, the need to determine some already installed software version, software version must conform to the requirements listed below.I.e., if the existing system has the following software, version must be exactly the same as that of the versions listed below, if not the installation program will be installed on its own.
Software configuration precedent chart 3-1 table
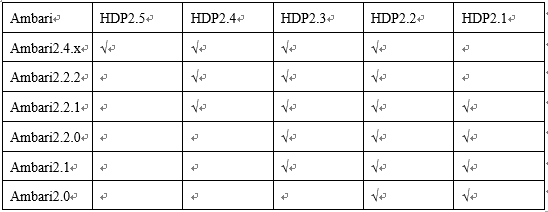
3.2 Ambari and HDP version compatibility
Due to a software version upgrade, compatibility between versions due to the version may cause some problems.
Table 3-2 version compatibility
4 Install examples
In this paper, the choice of system and the software version, shown in the table below:
Table 4-1 system and software version
![]()
4.1 Installation Ambari before the operation of the system
4.4.1 configuration host name
Ambari cluster configuration information is through the fully qualified hostname to determine the cluster machine information, so you have to make sure it is the host name.
4.1.2 Configure cluster information
Hosts file on each machine to do mapping configuration, command is as follows:
# vi /etc/hosts
Then add the following content:
Table 4-2 IP mapping information table

4.1.3 Configure SSH password free exchange
First of all, the primary node and other nodes are executing the following command, to ensure that each machine can produce the public key.
![]()
Then enter all the way. Then each node’s public key to form a new authorized_keys file, then distributed to each node. Thus, completed each node from the login operation.
4.1.4 Configure NTP time synchronization
In the first place on the primary node to do the following:
(1) install the NTP time server:
#yum install ntp
(2) modify the NTPD configuration file
(3) open the time synchronization server
#sevrice ntpd start
(4) in each from the other nodes to do the same operation, thus the NTP synchronization is complete
4.1.5 Closed selinux
Permanently closed SELinux
# vi /etc/selinux/config
Change the SELINUX = enforcing to SELINUX = disabled
Restart to take effect, restart command as follows:
# reboot
4.1.6 Close iptables firewall
Permanent closure (need to restart)
# chkconfig iptables off
(need to restart the firewall temporarily shut down the firewall services)
service iptables stop
Check the firewall status
# chkconfig –list|grep iptables
Note: other services under Linux can use the above command to perform opening and closing operation
Restart to take effect, restart command as follows:
# reboot
4.2 Create yum local source
First check whether the master node HTTPD installation server, the command is:
rpm -qa |grep httd
If not, the installation, the command is:
#yum install httpd
Start the HTTPD
#service httpd start
chkconfig httpd on
All the files inside the folder and subfolders granted the same rights, the command is:
chmod –R ugo+rX /var/www/html
Open the network
vim /etc/sysconfig/network-script/ifcfg-eth0
Modified to onboot = yes
After successful installation, Apache working directory in/var/WWW/HTML by default.
Configuration:
Check whether the port is occupied, Apache HTTP service using port 80
[root@master ~]$ netstat -nltp | grep 80
If there is a footprint, installed after the need to modify the Apache HTTP service port number:
[root@ master ~]$ vi /etc/httpd/conf/httpd.conf
Modify the listener port, Listen to other port 80.
To download the installation files in the/etc/WWW/HTML, then start
[root@ master ~]$ service httpd start
Can check my http://master in the browser to see some of the Apache server page information, said started successfully.
5 The preparation for installation of completely offline Ambari
The difference between offline and online installation yum use different warehouse location, namely the remote installation package in the warehouse a share in local resources such as copies, and then create these resources in the yum warehouse package folder local repository package, can be installed in accordance with the online way to go.But needed to be resolved offline installation Ambari RPM package dependency problem, the first to make sure that postgresql8.4.3 has been installed, or a local postgresql8.4.3 warehouse.
5.1 Prerequisites
Ambari offline installation, you need to use yum, if it is a new installation of operating system, may lack a lot of necessary conditions, the following form according to the order of the once upon a time in the future, in turn, has achieved certain conditions, if can skip those conditions.
Because of complexity of the software operating system itself, such as the installation of tooltips have other required software or existing software upgrades, according to clew to solve it.
5.2 Establish a local repository
HTTP service installed on a machine within the cluster, and then will provide the tar packages or put the RPM package on the machine/var/WWW/HTML directory can be the default directory (Apache) under decompression, the best in this directory to create a new directory, all ambari tar packages and HDP and HDPUTIL is placed in it and extract the tar package, if the machine does not have to manually install PostgreSQL, will provide the software packages together into the local repository.
5.3 Set yum is not check GPG key
Tested off-line yum install Hadoop cluster, it is GPG key check to install software and lead to errors, can through the closed system at this time of yum GPG check to avoid mistakes
# vi /etc/yum.conf
Set gpgcheck attribute value is 0
gpgcheck=0
5.4 Installation ambari services
# yum –install ambari-server
5.5 Ambari Settings
# ambari-server setup
Will appear after the operation whether enter ambari – server daemon, choose the JDK, configuration information such as database, can undertake choosing according to the requirements of the system itself.
When there is a “Ambari Server setup completed successfully”, explain Ambari – Server configuration is successful.To be sure, the database of installation option is a PostgreSQL database, in which the user and the database is the default in advance good;If choose the MySQL database, the need before installing the Ambari – server build user, giving permission, built a database, and so on.
Then start ambari – server, according to the need to install the hadoop ecosystem services.
The custom service service
1 Ambari custom extension service
From the first part, the ambari for secondary development function, the main job is to research the components such as integrated into the ambari, monitoring and management. This paper is to integrate redis.
First, because the service is belonging to the stack, so it decided to customize a service belongs to which stack., again because you have installed HDP2.5.0 stack, so this paper will set the service to place under the stack of HDP2.5.0. New service called: redis – service, including structure diagram as shown in the figure below:
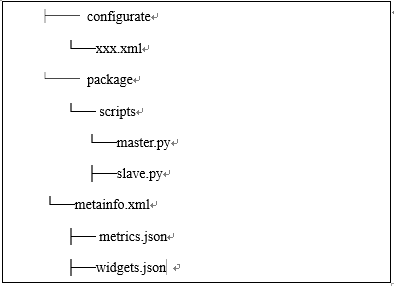
Including configurate the XML file to configure this module call main installation is complete package service main q control in the life cycle of python file, metainfo. The XML file is defined mainly asked some attribute of the service, the metrics. The json and widgets. Json controls the service interface diagram shows.
The metainfo. XML instance as follows:
1 2 3 4 5 6 7 8 9 10 11 12 13 14 15 16 17 18 19 20 21 22 23 24 25 26 27 28 29 30 31 32 33 34 35 36 37 38 39 40 41 42 | <?xml version="1.0"?> <metainfo> <schemaVersion>2.0</schemaVersion> <services> <service> <name>REDIS-SERVICE</name> <displayName>Reids</displayName> <comment>My Service</comment> <version>1.0</version> <components> <component> <name>MASTER</name> <displayName>Master</displayName> <category>MASTER</category> <timelineAppid>redis</timelineAppid> <cardinality>1</cardinality> <commandScript> <script>scripts/master.py</script> <scriptType>PYTHON</scriptType> <timeout>5000</timeout> </commandScript> </component> <component> <name>SALVE</name> <displayName>Slave</displayName> <category>SLAVE</category> <cardinality>1+</cardinality> <commandScript> <script>scripts/slave.py</script> <scriptType>PYTHON</scriptType> <timeout>5000</timeout> </commandScript> </component> </components> <osSpecifics> <osSpecific> <osFamily>any</osFamily> </osSpecific> </osSpecifics> </service> </services> </metainfo> |
Second, we need to create a Service life cycle control script master. Py and slave py.Here need to ensure that the script path and in the previous step metainfo. In XML configuration path is the same.The two Python script is used to control the Master and Slave module of life cycle.The meaning of the script function as well as its name: install is install call interface;Start, stop, respectively is start-stop call;The Status is regularly check the state of the component invocation.The master. Py and slave. Py template for:
Master.py
1 2 3 4 5 6 7 8 9 10 11 12 13 | class Master(Script): def install(self, env): print "Install Redis Master" def configure(self, env): print "Configure Redis Master" def start(self, env): print "Start Redis Master" def stop(self, env): print "Stop Redis Master" def status(self, env): print "Status..." if __name__ == "__main__": Master().execute() |
Slave.py
1 2 3 4 5 6 7 8 9 10 11 12 13 | class Slave(Script): def install(self, env): print "Install Redis Slave" def configure(self, env): print "Configure Redis Slave" def start(self, env): print "Start Redis Slave" def stop(self, env): print "Stop Redis Slave" def status(self, env): print "Status..." if __name__ == "__main__": Slave().execute() |
Again, the redis RPM installation file into the HDP installation package/var/WWW/HTML/ambari/HDP/centos6 / directory.
Again, restart ambari – server, because ambari server only when the restart will read Service and Stack configuration.The command line: ambari – server restart.
Finally, the login Ambari GUI, click on the lower left corner of the Action, select Add Service.The diagram below:
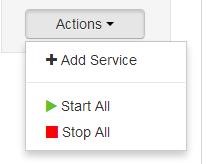
At this point you can see in the list of installation service Redis service. Then check whether the service installation is successful.
2 Ambari implement custom extensions service interface display
Service in the first quarter of the second chapter mentioned metircs. Custom json and widget. The json, the widget is a Ambari figure controls appear in Web Metrics, it will according to the value of the Metrics, to make a simple aggregation operation, finally presented in figure control.Widget is Ambari further enhance the ease of use, and can be configured.Widget is displayed AMS Metrics collected properties.
Then last here, including the metrics. Json template for:
1 2 3 4 5 6 7 8 9 10 11 12 13 14 15 16 17 18 19 20 21 22 23 24 25 26 27 28 29 30 31 32 33 | { "REDIS-MASTER": { "Component": [ { "type": "ganglia", "metrics": { "default": { "metrics/total_connections_received": { "metric": "total_connections_received", "pointInTime": true, "temporal": true }, "metrics/total_commands_processed": { "metric": "total_commands_processed", "pointInTime": true, "temporal": true }, "metrics/used_cpu_sys": { "metric": "used_cpu_sys", "pointInTime": true, "temporal": true }, "metrics/used_cpu_sys_children": { "metric": "used_cpu_sys_children", "pointInTime": true, "temporal": true } } } } ] } } |
widget.json:
1 2 3 4 5 6 7 8 9 10 11 12 13 14 15 16 17 18 19 20 21 22 23 24 25 26 27 28 29 30 31 32 | { "layouts": [ { "layout_name": "default_redis_dashboard", "display_name": "Standard REDIS Dashboard", "section_name": "REDIS_SUMMARY", "widgetLayoutInfo": [ { "widget_name": "Redis info", "description": "Redis info", "widget_type": "GRAPH", "is_visible": true, "metrics": [ { "name": "total_connections_received", "metric_path": "metrics/total_connections_received", "service_name": "REDIS", "component_name": "REDIS-MASTER" } ], "values": [ { "name": "total_connections_received", "value": "${total_connections_received}" } ], "properties": { "graph_type": "LINE", "time_range": "1" } } } |
At this point, restart ambari – service, command is as follows:
1 | ambari-server restart |
3 Data acquisition and sending
Using shell script to run redis information data acquisition and one-time send to the metrics of the collector, the script is as follows:
1 2 3 4 5 6 7 8 9 10 11 12 13 14 15 16 17 18 19 20 21 22 23 24 25 26 27 28 29 30 31 32 33 34 35 | #!/bin/sh url=http://$1:6188/ws/v1/timeline/metrics while [ 1 ] do total_connections_received=$(redis-cli info |grep total_connections_received:| awk -F ':' '{print $2}') total_commands_processed=$(redis-cli info |grep total_commands_processed:| awk -F ':' '{print $2}') millon_time=$(( $(date +%s%N) / 1000000 )) json="{ \"metrics\": [ { \"metricname\": \"total_connections_received\", \"appid\": \"redis\", \"hostname\": \"localhost\", \"timestamp\": ${millon_time}, \"starttime\": ${millon_time}, \"metrics\": { \"${millon_time}\": ${total_connections_received} } }, { \"metricname\": \"total_commands_processed\", \"appid\": \"redis\", \"hostname\": \"localhost\", \"timestamp\": ${millon_time}, \"starttime\": ${millon_time}, \"metrics\": { \"${millon_time}\": ${total_commands_processed} } } ] }" echo $json | tee -a /root/my_metric.log curl -i -X POST -H "Content-Type: application/json" -d "${json}" ${url} sleep 3 done |
Run the following commands (note here is that parameters 1 is the Metrics of the Collector machine, is not a Ambari Server machine) :
./metric_sender.sh ambari_collector_host total_connections_received redis
Process if no accident, wait for 2-4 minutes to interface with data display. Through the above operation, can be implemented to include ambari not in monitoring management software to monitor.